Monday, September 19, 2016

Sewist's Log


When I got back into sewing again, I wanted a way to document my garments that was easy to both create and access. The perfect recording system would allow me to recollect what the fabric looked like and the cost, along with other pertinent details. I've done pretty well keeping up with the documentation and enjoy looking back to see what I've accomplished over the year. I've attached a downloadable PDF if you'd like to give my system a try.


You can see where I've added a comments section where I'll record anything I think might help me if I decide to make something similar, any problems I encountered or where I purchased the fabric. I keep a glue stick handy and attach a scrap of the fabric, too.


I place everything in a 3-ring binder that lives among my sewing things - ready to grab at the completion of my garments.

How do you document your sewing adventures?


Share:

Thursday, September 1, 2016

Indigo Love

Recently I took an all-day indigo dyeing class with Ruth Chandler from Colorado Springs. Ruth grew up in Japan and learned to sew and dye from her Japanese adopted grandmother. We were to have brought our fabrics, clamped or stitched, ready to dye. It was a beautiful August day with brilliant sunshine. Ten of us oohed and ahhed all day at each others' work.

This tunic is 100% silk with some texture, possibly tussah? It has a lovely drape and responded well to the indigo dye. I folded and pressed the fabric lengthwise in accordian folds of about 4". Then I folded the fabric crosswise the same way. I left about 10" hanging from one edge of the folded up squares for the bottom. I clamped 4" wood squares on each side prior to dyeing. Each piece (front and back) were dyed at the same time, a total of twice in the vat. After the second dip, I removed the squares and without unfolding, added wooden circles to each side and dyed again.

I decided the inner squares could be a bit more defined and so I refolded and dipped the material and placed wooden circles at various points on the inside of the folds as well as each side.


Here's a grouping of the other items I dyed that day.


Below is a pole-wrapped rayon knit.


I pole-dyed enough of this teal silk to make a tunic with a gathered skirt.


Same silk as the above tunic for a scarf. The circles are about 8" in diameter.


This started as a grey wool jersey that I stitched across and gathered tight. It will make a great knit shirt of winter.


I dyed a few more pieces that day to be featured in another post. It was incredibly fun, and I recommend it to any fabric fanatic!
Share:

Friday, May 20, 2016

Skinny Jean Redo

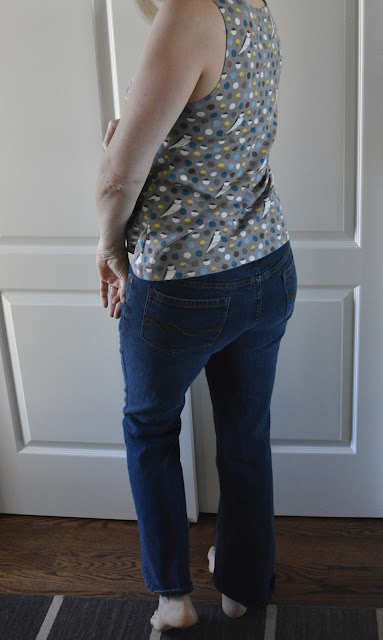
I have wanted to own a pair of skinny jeans that are cropped rather than cuffed. I've seen versions with a ragged hem and thought they could be cool. I decided to scout out Goodwill and see if I could find a pair I liked that I could redo. I was looking for something in a dark wash with some spandex that wasn't too tight. There was a pretty good selection in my size, but I still found just one pair I thought would work for a whoppin' $5.99!


These jeans fit closely through the thigh so I could alter them from the knee down. I tried them on and pinned them from the right side on one leg. I marked at the pins and drew a straight line from nothing at the knee to the desired width at the hem. After stitching the new seam and before trimming it, I tried on the jeans to check the fit. Luckily, the first stitching worked, so I finished the other leg and trimmed and serged the seams. I chose to stitch 1/2" from the edge of the hem and let it ravel out. I assume it will look even more ragged after washing. I'm pleased with the finished skinny jeans and even more pleased to have upcycled!


Share:

Tuesday, April 26, 2016

World City Tee


I'm always look for ways to combine my two passions - lettering and sewing. I began playing around with world city names in a loose brush style with the intention of creating a fabric to print at Spoonflower.com. I used sumi ink and a fat brush to hand-letter a bunch of city names and then arranged them in Photoshop to create an all-over design. This fabric is available for purchase here if it speaks to you!

I own several books on pattern design. They all offer something unique and have given me a lot of confidence to design fabric. I love A Field Guide to Fabric Design by Kimberly Kight for excellent instruction in using Photoshop and Illustrator. I would also recommend Mastering the Art of Fabric Printing and Design by Laurie Wisbrun. It's beautifully photographed and has a wealth of information. Spoonflower has also published a book to help anyone design fabric. It's called The Spoonflower Handbook.


Once I had the fabric printed, I used my favorite self-drafted tee to construct this luscious organic cotton. At $25 per yard, I wanted to feel confident about the fit of the tee. Even though that's a pretty steep cost per yard, having a designer tee is worth it for me (and Spoonflower runs sales now and again). 


Let me know if you have any questions about designing your own fabric. I'll answer as best I can.


Share:

Sunday, April 24, 2016

Linen Love


I've actually managed to make a garment that is not from a knit fabric! I admit I love the ease and super comfiness of knit garments, but I'm really trying to branch out. I recently purchased this grey slub linen at JoAnn Fabrics for $23.00 (after a sale and my ASG discount). The pattern is a Patty Reed design from Simplicity patterns, #1543. I made the small which encompasses sizes 10 & 12 without any alterations. The fabric was a dream to sew even with a slight tendency to stretch. 


What drew me to this pattern is the prodigious use of topstitching. I thought this might be especially wonderful on a 100% linen fabric, and I was right! I recently purchased a Craftsy video by Janet Pray called Advanced Industry Techniques from which I have learned loads. One tip she gives is to use a wooden point turner to "press" without an iron. This technique came in handy when I was trying to prepare the drawstrings. They started out as 1" wide and the pattern instructed to fold each in half once and then fold the raw edges to the fold, resulting in a 1/4" wide piece. I used the iron to press the drawstrings in half and then used my wooden pointer to "press" the other raw edges to the inside. This saved my poor fingers from being singed to pieces. Of course, not all fabrics would respond to this treatment as easily as linen, but it's certainly a good trick to have up one's sleeve (no pun intended!). 


I love the way this garment floats around my body, making it the perfect foil to skinny jeans (which I didn't make) and booties. As the weather warms, I may wear it with leggings and sandals. The stitching is the star here so I've kept my accessories to a minimum - one nice pendant and a statement watch. 

Share:

Saturday, April 23, 2016

Racerback Maxi


It's not really spring yet here in Colorado since there's still a bit of snow on the ground and we might get another storm later this week, but I feel the need to push things a bit. This sleeveless maxi dress fits the bill. This single knit beauty came from my stash, originally purchased at Colorado Fabrics in Denver on their flat-fold table (meaning no info on fabric type). It has a lot of crosswise stretch and I suspect it's 100% polyester. I keep receipts for what I've paid for all the fabric I purchase and this little number was $4.50. Score! I used McCalls 6559, size 12. The neckline on this puppy is really low still even after I took in an additional 5/8" seam at the shoulder. This alteration also brought the sleeve depth up some which is a good thing to hide the underarm bulge (almost!). I love the racerback detailing. The armholes and neckline are all finished with a simple turn under and topstitched technique. I used my Janome coverstitch which did a really nice job. 


I wore the dress on a Denver shopping expedition with my friends today (shout out to Deb and Kimmi!) and it was really comfortable even though the promised 77° didn't happen. This was actually my "muslin" for this pattern, and I have a fun shibori print I plan to use for a shorter version. The pattern features a front tie cover-up which will be nice to have with the cool Colorado evenings. Definitely a go-to pattern and dress for summer. Now back to my arm exercises!


Share:

Friday, April 22, 2016

Pincushions and Memories

At a recent neighborhood meeting of the American Sewing Guild, the program was on pincushions. Members brought pincushions they had made, received as gifts or those with sentimental value.  I was moved by the latter most of all. Many women had pincushions made by their mother or grandmother. My mother and both grandmothers were sewers. Recently my mother died and I had an opportunity to look through her sewing things. She had the ubiquitous tomato pincushion and seeing it brought back many lovely memories. My sister is going to take her 1950’s Singer on which scads of garments were made. I have two sisters and we often had matching dresses made by my mother, especially at Easter or Christmas. One Easter photo shows one sister, my mom and I all in dresses and COATS she had made. I wonder how she found the time! Mom also made my Homecoming Court dress from velvet (they were always velvet for some reason), combining patterns to get the look I wanted. She also made a quilt for me when I got married.

My Grandma Lura sewed all her own clothes plus literally hundreds of quilts in her 93 years. She wasn’t bothered too much with being a perfectionist (I could have learned a thing or two from her about this). She had or saw a need and went about filling it. My Grandma Ruth Jane loved embroidery, especially pre-stamped cross stitch-patterned blocks. She was quick about finishing these blocks and then wanting my mother to sew them together with strips for her.

I love that I’m carrying on in a long line of sewists and that I can feel a connection with my mother and grandmothers as I sew.


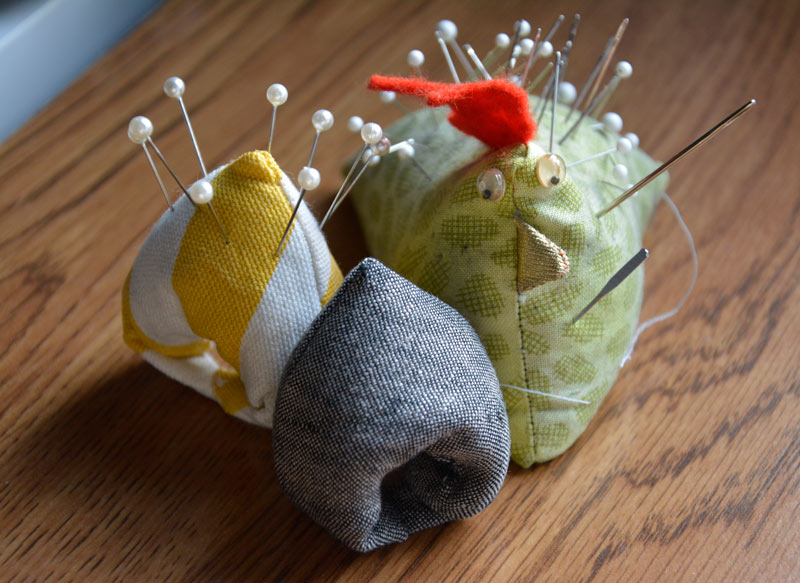
I made a couple little pincushions from a pattern I found at Annie’s Crazy World. The yellow stripe is stuffed with steel wool and the linen with batting. I wanted a pincushion close at hand and had considered a wrist version. These thumb beauties hold just enough pins for a single seam to use while at the sewing machine.  They take just minutes to whip up. The adorable bird pincushion was made for me by my friend Deb and is filled with buckshot, so he is a sturdy fellow.
Share:

Meet Toni


I have always loved my current sewing machine. I bought a Viking 180 from the independent fabric shop where I worked about a year after I got married. It was an entry-level machine but such a workhorse. I made lots and lots of garments with it.  When I started sewing again in earnest a few years ago, I never thought about buying a new machine. Oh, occasionally I wished I had a needle-down feature or a better light., but it wasn’t until I started watching some Craftsy videos and later took a sewing class at the Puyallup expo that I realized a new machine might have several features worth trading up for.

I had no desire for an embroidery machine and was frustrated at first that it seemed all the bells and whistles were only available on the high-end embroidery machines. Of course I was predisposed to prefer Viking machines, but I also was thinking of “switching sides” and getting a Bernina.

I made a list of the features I really wanted (good advice from a sewing blog) and set out for a local sewing expo where I knew I would be able to look after several different brands of machines all in one place. It was to be an exploratory outing only. I imagine you can guess what really happened. Yep, I came home with a brand new sewing machine but not the one I intended to buy when I went in.

I did look at a really nice Bernina (read, really expensive), the 740. It’s a lovely machine with really sexy styling. With the show special and 36-month financing, I was tempted. I had already looked at a nice Pfaff machine but really didn’t like the way the machine sloped right in front of the needle. While I was thinking about it, I decided to go to the BabyLock booth and look at their semi-industrial machine, Jane. There wasn’t one on the show floor so the salesman showed me their regular machines. I ended up buying the Soprano machine (you can probably guess why I named her Toni) and bringing it home.

This machine is less than half the price of the Bernina I looked at and a grand cheaper than the Pfaff, yet it had all of the same features. What sealed the deal is the warranty – 25 years on the machine and 5 years on the electronics compared to a one year warranty for the Bernina!

I’ve made a garment already and the machine sews like a dream! More on my favorite features in the next post.
  

Share:
© patterned | All rights reserved.
Blog Layout Created by pipdig